


10 TOP SEWING TOOLS FOR BEGINNERS ...
- theslightlyfrayeds

- Apr 29, 2021
- 8 min read

When I first started sewing many years ago I had NO CLUE what i was doing. I didn't know how to thread a machine let alone all the different tools and tricks that were used to create those wonderful projects that my grandmothers always made look so easy.
The day I brought my first sewing machine I marched home with my newly purchased toy and some basic cotton blend from Lincraft prepared to create a masterpiece.
I soon learned that there was many different tools that sewers needed to create and craft their projects.
Now there are of course the obvious things like a sewing machine, thread and needles but there are also things that people don't always think about when they are planning their first project.
With so many things on the market today to improve your sewing experience its hard to know where to start, so below I have outlined ten of my most commonly used and in my view essential tools for a sewing beginner.
1: Iron and Ironing Board
The NO 1 item that I use more then anything else when sewing ( other than my machine of course) is my Iron. It is set up in pride of place along side my sewing desk to ensure easy access and will pretty much be in use for the entire time I am working.
Until I started sewing ironing had never been a big part of my life so I had NO IDEA the difference between a basic iron and a high quality iron, just for the record, its huge.
When sewing you will use an iron to smooth out wrinkled fabric that has been folded or scrunched, press and steam seams and hems, apply interfacing and stabilisers and constantly smooth your work to ensure there is no lumps and bumps whilst sewing.
Cheaper less quality irons tend to leak or have inconsistent temperatures which can damage some fabrics or even melt and scorch. I firmly believe investing in the best quality iron you can afford will pay off in the long run with less replacements and damage to fabric.
Some things to look for when purchasing an iron include
- Range of temperature - Can you select specific fabric types
- Good steady steam distribution
- A ceramic or stainless steel sole plate for easy gliding on fabric
- An auto off setting for those times your distracted and forget to switch it off (GUILTY)
- What type of controls it has dials, slides or digitally controlled
- Cordless or corded depending on needs

2: A good quality pair of Dressmaking shears.
I can not stress enough how important it is to invest in the best quality scissors you can afford. These will be something that you use regularly and require proper care and selection to meet your needs.
Dress making shears have long blades usually 7 to 10 inches long that are perfect for cutting through long lengths of fabric. One tip is pointed whilst the other is rounded which protects the fabric from being pulled or snagged on the tip. They have a knife edge blade which means that the blade is angled for a sharper more precise cut.
There are various brands of dressmaking shears some of the more common ones here in Australia are Fiskers, Klasse and Kai. Prices vary and can range from $20 to the $100 mark.
My current pair of dress making shears are a KLASSE CHROME drop forged pair. They are quite heavy compared to the plastic handled styles which at times can lead to hand fatigue when doing large amounts of cutting. I always suggest if possible testing different styles of scissors before making a final choice

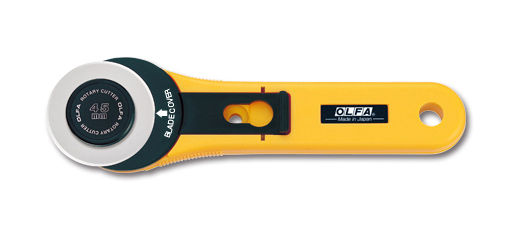
3: Rotary cutter
A rotary cutter is a must have item. Particularly if you are planning on doing any kind of quilting or patchwork style projects that require precise and straight edged cuts.
Rotary cutters come in different sizes but the most commonly used is a 45mm blade. You can choose from a straight cutter or an ergonomically shaped cutter depending on your preference. I prefer an ergonomic handle as it greatly reduces hand fatigue and is easier to grip.
A rotary blade is essentially a razor that slices through the fabric as it rotates creating clean straight edges when used with a patchwork ruler. It also allows for an easier cut around curves on pattern pieces.
The blades are changeable as blades go blunt over time or dull spots appear. The cost varies depending on brand but a mid range rotary blade cutter will set you back approximately $25 - $35.

4: Cutting Mat
Using a cutting mat not only allows you to protect both your fabric and your scissors and rotary blades from damage but they are also marked with both imperial and metric markings to allow for more precise measuring and cutting of your fabric.
Self healing mats are the best option when using rotary blades as this prevents the mat from sustaining significant damage and cuts that can jag and pull on fabric or create dull spots on your blade.
Caring for a self healing mat is important as it extends the life of the mat greatly. It is important to clean your mat regularly by soaking it in water usually in a bath tub or the base of a shower for 20 minutes with 1/4 cup of vinegar per litre .
Then gently using a soft bristled brush and dish soap mildly scrub the mat to remove any debris. Gently towel dry and lay flat in a warm but shaded area. Never expose to direct sunlight while drying as this can cause the mat to dry hard and crack.
There are many different sizes of cutting mats but my rule of thumb is the bigger you can afford or store the better.

5: Patchwork Ruler
A patchwork ruler is an essential item to have if you plan on working with quilts or patchwork projects. I use my ruler every single day when I sew and it allows me to neaten up edges and create precise measured cuts that are perfectly straight.
Made from laser cut perspex with measurements printed on them they are generally transparent so you can see the fabric you are working with underneath. They can be purchased in different shapes such as squares, dresden wedges or hexagons shapes for specific quilting techniques but the most common and versatile option is a straight edged ruler that can vary in length depending upon your needs.

6: Pinking Shears
Pinking shears are a type of scissors with serrated blades that cut the fabric in a saw tooth pattern along the edge.
Pinking shears are generally used in situations where the person does not own a overlocker to finish seams in a suitable way that will prevent them falling apart during wash or wear.
Woven fabric that is prone to fraying needs to be finished in such a way that the fibres are unable to pull apart . Usually they will be overlocked or hidden within a french seam however in situations where this is not possible or preferable a pinking shear is of particular use.

7: Long fine tip tweezers
These babies are perfect for threading machines and overlockers or removing wayward threads that are caught in hard to reach places. If you are cursed with sausage fingers like me you will have a hard time reaching into smaller spaces to do what you need to do.
Newer models of sewing machines tend to be equipped with self threading tools attached however up until recently I needed to thread my machine by hand and tweezers made this a fairly simple process giving more accurate control over the thread as it was moved.
This is similarly the case when threading overlockers which are notoriously difficult given the various thread paths that need to be completed in a specific order and the compact nature of an overlockers internal parts.
Having a pair of tweezers to assist manoeuvring the delicate threads through various parts of the machine is of great assistance and makes the complex process a lot easier.
Tweezers used for sewing are typically 6 inches or so in length with a curved tip and grips on the handle and points.

8: Measuring Tape
A measuring tape is a flexible strip of usually acrylic material that is marked on one or both sides with imperial or metric measurements or both.
The most common length available is 60 inches or 152cm. They are a very cheap addition to your sewing kit but invaluable and something you will use on a regular basis.
Being flexible means that they are perfect for taking body measurements as required when dressmaking and allows for greater accuracy when taking measurements of curves.

9: Pins
Sewing pins are a staple in any sewing kit. Used to pin fabric in place , draping and attaching pattern pieces to fabric for cutting they are something that you will find in any sewing space.
It may seem like a basic thing but there are actually many different types of sewing pins designed for a variety of uses.
Quilting pins - These are longer and and stronger than traditional needles to allow for them to penetrate and hold together thicker layers of sandwiched fabric. They usually have bright plastic heads to allow for ease of viewing when quilting a project and as most ironing is done before or after quilting they wont be exposed to heat.
Silk pins - These pins are usually completely metal and come in a variety of weights. They are delicate and allow for minimum damage to delicate fabrics such as silk, satin and chiffon.
Glass head pins - These are very commonly used by sewers, they have a glass head that wont melt under the heat of an iron and a strong non flexible shaft that is 0.5mm in diameter.
Ball Point Pins - These are specifically for use with stretch knit fabrics. The rounded tip allows the needle to slide between the threads of the fabric without causing breakage. Knit fabrics are made up of continuous loops so when breakage occurs unravelling can occur.

10: Bodkins or Safety Pin
A bodkin is an instrument that is used to thread ribbon, cord or elastic through tubes or casings in a sewing project. It is commonly used for things such as elastic waistbands or cuffs or drawstring bags etc.
There are two types of of bodkins that I personally use, one is shaped like a large thick sewing needle with a large eye to thread through it is then pushed through the casing from the opening through the tube and out the other end.
The second type of bodkin is shaped similar to a pair of tweezers with small serrated teeth for gripping. This is threaded through the casing as described above and the ribbon/cord/or elastic is released from the teeth once it has exited the other end
In the past old school sewers would use a safety pin in place of a bodkin to complete the task they would fasten the pin through the item to be threaded and gently push the pin along the tube from the outside until it reached the end. Although there is nothing wrong with this I personally prefer to use bodkins because they are both cheap and as the safety pins always seem to pop open and stab me mid way through threading the casing if I apply too much pressure.

11: Seam Ripper
One of the things that I hate the most is when I have just finished sewing a project and realise that something is amiss and must be re-done.
ENTER the humble seam ripper.
A seam ripper is something you have probably seen before if you have an interest in sewing. It has a short shaft a couple of inches long with a forked tip. The fork has a small blade that hooks underneath the thread that needs to be cut and is gently slid upwards to sever the thread and allow the seam to be pulled apart and re-sewn as required.

NOW ... I am not endorsing any particular product or brand these images are simply examples of each item. The truth is sewing is a highly personal hobby and everyone will develop their own style and preferences with the products they use but with the above items in your sewing kit you are well equipped to tackle any project you may decide to try.
Thanks for reading
Comments