


30 Minute simple girls skirt for beginners - Step by step tutorial
- theslightlyfrayeds

- May 1, 2021
- 6 min read
Updated: May 2, 2021
I LOVE making clothes. It's my favourite type of project, from the selection and matching of fabrics to the final product.
Lots of people who don't sew often ask me why bother making kids clothes. They are so cheap at Kmart and thats true they are, but I often find that cheaply made clothing items are terrible quality, last weeks maybe one season if lucky and get stained, grubby and misshapen easily.
BESIDES .... there is something so rewarding about watching your little one wearing your own creations and being able to tailor their size and interests that makes my heart smile.
When I first started sewing my first goal was to sew something that I was actually proud for my daughter to wear. One of the simplest and most versatile pieces of clothing that a beginner can sew is a a basic elastic waisted skirt there is only two-three seams required as well as a waist band and hem.
This item is so quick and easy that can be done by any level of sewer in as little as 20 minutes.
SO firstly we need to establish what we need for this project. To sew this little beauty you will need the following;
- 1/2 metre of main fabric
- 1/4 metre of coordinating fabric
- 18mm wide elastic for waistband
- Coordinating thread
- Rotary cutter
- Patchwork ruler or straight edge substitute
- Pins

The first thing that we need for this skirt is to cut two identical rectangles in your main fabric using the measurements below . The best way to be as accurate as possible is by using a rotary cutter and patchwork ruler however a sewing tape and dressmaker shears can be used if you don't have access to these.
TIP: Be sure to check the direction of your print before cutting to make sure both pieces are right way up you would be surprised how often this is overlooked


Once you have completed this step you will need to take your coordinating fabric and
cut two identical strips that are the same length as your rectangle piece and 2.5 inches / 6.3cm high.

At this stage you should have two larger rectangles of your main fabric and two smaller strips of coordinating fabric cut.

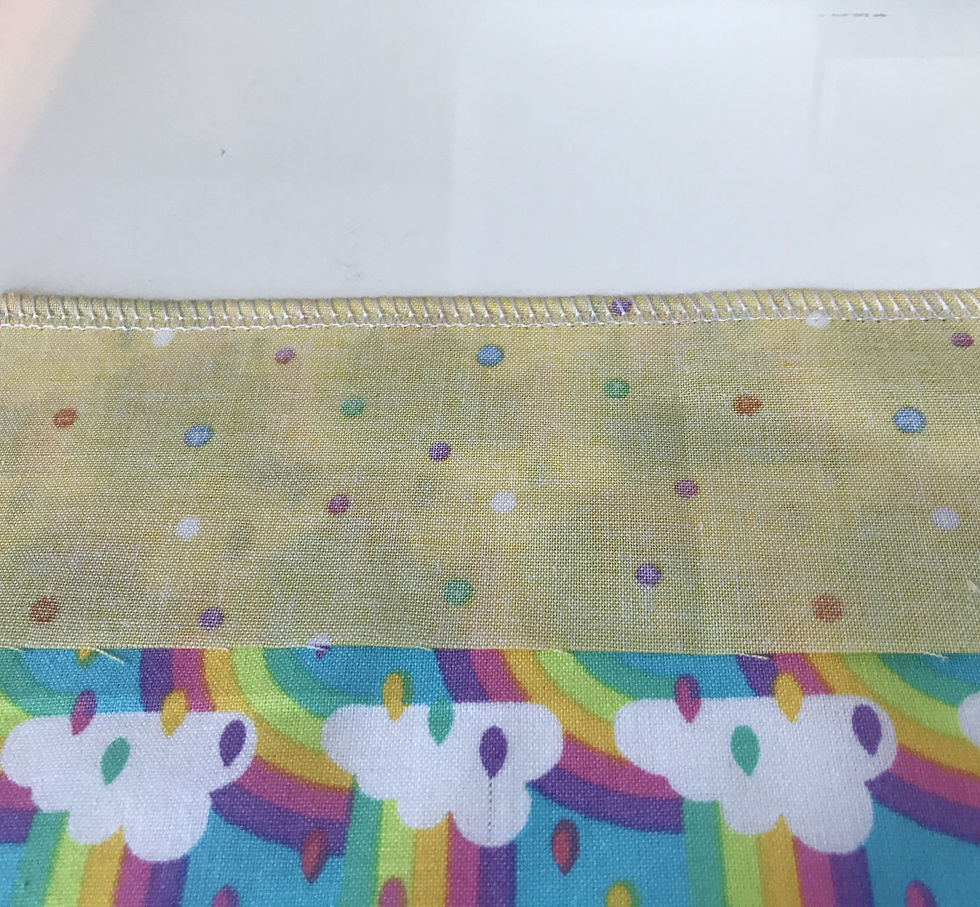
Next you need to take your coordinating strip and place it right sides together
along the bottom of your large rectangle . This means with the print side of your fabric facing inwards towards one another as pictured below.

At this stage we will be sewing these two sections together. I will be using my overlocker here, however if you do not own an overlocker you can either choose to use a basic zig zag stitch on your sewing machine or a straight stitch and trim with pinking shears to avoid fraying.
My overlocking stitch is roughly 1/4 inch wide so if you are using your sewing machine you will want a similar seam allowance.
Most domestic machines have markings printed or stamped on the sewing plate. Be sure to line up your edge with the correct marking and follow that all the way to the end.
Accurate seams will make for easier piecing together later on in the project.
Now we need to iron down the seam so it lay flat . Depending on which way you want the fabric to overlap will determine which way you iron down your seam.
As I wanted my rainbow fabric to be overlapping I ironed my seam pointing upwards towards the rainbow fabric. View the picture below.
Next we will overlock along the raw edge of the hemline. If you are not using a overlocker you can skip this step as your method for hemming will be slightly different and covered later in the tutorial.
Repeat the above steps for your other rectangle and you should end up with two seperate rectangles with coordinating hem.

Now we are going to top stitch down our hem seam. It really is a personal preference if you want to do this. It isn't technically necessary but I believe that top stitching not only gives the garment a more polished look but also makes it sit better.
I always line up my edge with a specific point on my machine foot and slowly follow this along as I sew making sure it stay in line with that point. This gives me a straight line every time .
In this instance I wanted a narrow distance between the edge of my rainbow fabric and my stitch line so I have lined up the edge with the edge of the hole in my sewing foot.

Repeat this step with your second rectangle and you should now have two identical pieces that have been top stitched as per the picture below.

The next step is sewing the two rectangles together down each side. Take both rectangles and lay them facing right sides together. Remember this means with the print facing inwards towards on another.
Line up the seam where your hem meets your main fabric ensuring the two sides are lined up directly on top of one another and pin in place about an inch from the edge of the fabric, do the same along the bottom edge of the hem.
If you have measured, cut and sewn accurately they should match up well with any variance being slight.
Sew from the bottom of your hem all the way up the to the waist on both sides of your rectangles and you should end up with something like this.

Now we need to create a casing that will form the waistband of your skirt. To do this fold the top of the waistband down 1/4 inch or roughly 1/2cm for those who work in metric terms and press all the way around the waistband.
Fold the waistband down again this time 1 inch or 2.5cm and press all the way around. I have opted for wide width elastic for this skirt as I find that narrower waist elastic can be uncomfortable and sit funny.

Now it's time to sew our casing, to do this simply repeat what we did above when top stitching the seam. Line up the edge of the waistband that has been folded and pressed with a specific point on your sewing foot.
Select a start point at the rear of the skirt and sew right around the waistband stopping 2 inches or 5cm from your starting point this will leave a gap in the waistband that you can feed your elastic through.

Before we go ahead and thread the elastic we need to finalise our hemline. It's much easier to do this before inserting the elastic as the fabric is still flat and easier to work with.
To make the hemline we follow the same process that we used for the waistband. If you have overlocked the hem already simply need to fold over the hem roughly 1cm and press in place.
If you are using your sewing machine and have not overlocked your hem then you will need to first fold your hem 1/2cm all the way around and press in place. You will then fold and press a second time 1cm all the way around and stitch in place using the edge of your sewing foot as a guide.

Now that the hem as been stitched in place we can turn our skirt right side out and press flat to remove any creases that may be present.
To complete the waistband you need to now measure around your child's waist and deduct 1.5 inch from the total measurement. This is the length of elastic you will require for your waistband.
To thread the elastic take your bodkin that looks like a large sewing needle and insert the elastic through the eye and pull down the shaft to hold in place as shown below.
If you do not have a bodkin you can feed the elastic old school style with a safety pin. To do this simply fasten the safety pin through the end of your elastic and you will feed this through your casing in place of the bodkin.

Feed the end of the elastic with your bodkin/pin attached into the opening and pin the other end in place to prevent it sliding into the casing. Slowly use your fingers to feed the elastic through until it reaches the opposite end.
You should now have two elastic pieces hanging out of each opening in the casing.
Overlap the two pieces and pull them clear of your fabric, using your zig zag stitch, stitch the ends of the elastic together to form a sealed loop which is now your waistband.

Now you can simply pull your elastic back into place and stitch the gap closed being careful not to catch the elastic in your as you do.
And VOILA 😍😍😍😍 A simple and versatile skirt that can be made by anyone and tailored to your little ones own tastes.
These can be worn on their own in summer or with tights for winter and are the perfect all rounder.

Comments